


Melon and Pumpkin Growth
Published:
The Very Basics
To grow a melon or pumpkin, you first need to plant the respective seeds on farmland. If there is a light level of 9 or higher one block above the seeds, the seeds will slowly turn into a stem by going through a total of eight stages. This process can be skipped by using bone meal on the seeds. Once the stem is fully grown, there’s a chance a fruit block (melon or pumpkin, depending on the seed you used) will appear on any of the four directly adjacent blocks (excluding diagonals), but only if there’s space (air) and if the block below is either farmland, dirt or grass. Moreover, the same lighting condition as for growing seeds applies here. Due to this condition, opaque blocks will stop the stem from growing and producing fruit if placed directly above it. Furthermore, the stem will even be destroyed automatically, if the light level during the day is less than 8 (e.g. in unlighted caves).
Once a fruit has spawned, all stems on adjacents blocks will stop growing more fruits until the fruit is removed. Note that it doesn’t matter where the fruit came from. A manually placed fruit block will stop the production just like a fruit block that came from a different stem. As long as there’s a fruit occupying one of the four possible spawn spots, the stem won’t spawn any more fruits (the visual connections in Minecraft can be misleading here). However, a melon block won’t affect a pumpkin stem and vice versa.


Growth Rate
There are several factors that determine how fast a stem will grow and produce fruit. They’re mostly the same as for growing wheat:
Farmland

To make your fruit grow fast, it is important to have hydrated farmland below the stem and at the 8 surrounding blocks (including diagonals). Although you can preserve dry farmland blocks by placing any type of seeds on it, dry farmland is far less effective (roughly 33%). This is especially the case with the block below the stem, which contributes four times as much as any adjacent block to the resulting speed. If you don’t know how to hydrate farmland yet, see the related minecraftwiki article.
To give you some numbers, it takes 13 random ticks (on average) for a stem on dry farmland with no surrounding farmland to grow a fruit. A stem on hydrated farmland, on the other hand, needs only 7 random ticks on average. When surrounded by 6-8 hydrated farmland blocks, it takes merely 3 random ticks. Random Ticks (RT) or Block Ticks occur much less frequently than game ticks, and, as the name suggests, they occur randomly. Minecraft also uses them for a lot of other things, e.g. leaf decay, grass spread and decay, mushroom spread, farmland (de-)hydration etc. According to the minecraftwiki, random ticks happen every 68 seconds on average for a given block.
Here’s a table showing you the average required time for a stem on hydrated farmland in relation to the amount of surrounding hydrated farmland blocks, assuming that there are always 4 spots for fruit to grow on:
| # Farmland | 0 | 1 | 2 | 3 | 4 | 5 | 6 | 7 | 8 |
|---|---|---|---|---|---|---|---|---|---|
| Avg Time | 7 RT | 6 RT | 6 RT | 5 RT | 4 RT | 4 RT | 3 RT | 3 RT | 3 RT |
Speed Penalty
The numbers shown above are not always true. There’s also a penalty which applies in two cases:
- there is another stem on a diagonal block
- there are two or more ajdacent stems (excluding diagonals) unless they are in a row
If either of these conditions are fulfilled, it will take the stem around two times as much time to produce a fruit.
Have a look at this layout:

Stems 1 and 7 only have one adjacent stem which is not placed diagonally. Thus, they’re not penalized. Stem 2 is also not penalized because the adjacent stems are in a row. Stems 3, 4 and 6 are penalized because there are stems diagonally to them, and stem 5 is penalized because the adjacent stems aren’t in a row.
Because of this effect, it’s often preferable to arrange stems in rows.
Here’s the table for penalized stems:
| # Farmland | 0 | 1 | 2 | 3 | 4 | 5 | 6 | 7 | 8 |
|---|---|---|---|---|---|---|---|---|---|
| Avg Time | 13 RT | 11 RT | 10 RT | 9 RT | 8 RT | 7 RT | 6 RT | 6 RT | 6 RT |
Adjacent Growing Spots
The number of spots fruits may spawn on has an impact on the productivity as well. Your stems will only produce at maximum speed if a fruit can spawn on all four adjacent blocks. If there are only three possible spots, the average required time will rise to 133%. For two spots, it’ll take twice the time, and for one it is 400%. That’s because minecraft randomly picks one spot, and if it doesn’t qualify, the whole spawning process will be skipped, instead of choosing a different spot.
Efficient Farming
Based on the first half of this tutorial, you should consider the following things when building a melon or pumpkin farm:
- hydrate the farmland below the stems
- use all four possible spawning spots (often not possible with automated farms)
- avoid speed penalty
- have (hydrated) farmland around your stems
- make sure there’s enough lighting, even at night
- prevent mobs from destroying your farmland
To keep fruits from spawning on a specific farmland block and thus turning it to dirt, you can place wheat or flowers on top of them. After a harvest, it may also be worthwhile to retill the dirt on which the fruit has spawned.
Improving Existing Farms
You may be able to improve your current farm by applying the criteria mentioned above. For example, if there’s dry farmland in your farm, hydrate it. If there are unused blocks around your stems, put more farmland there.
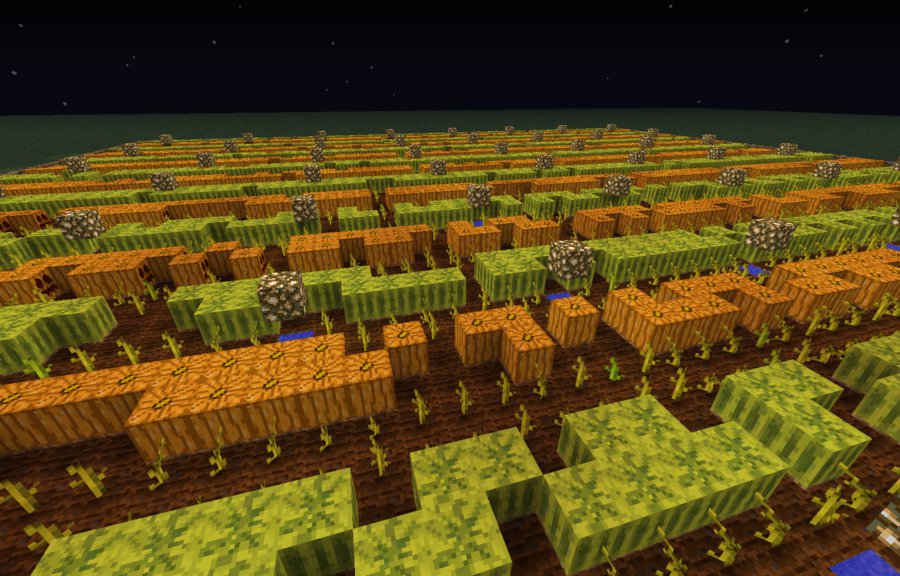
Here’s a farm I found on YouTube (I removed the pistons at the right half):
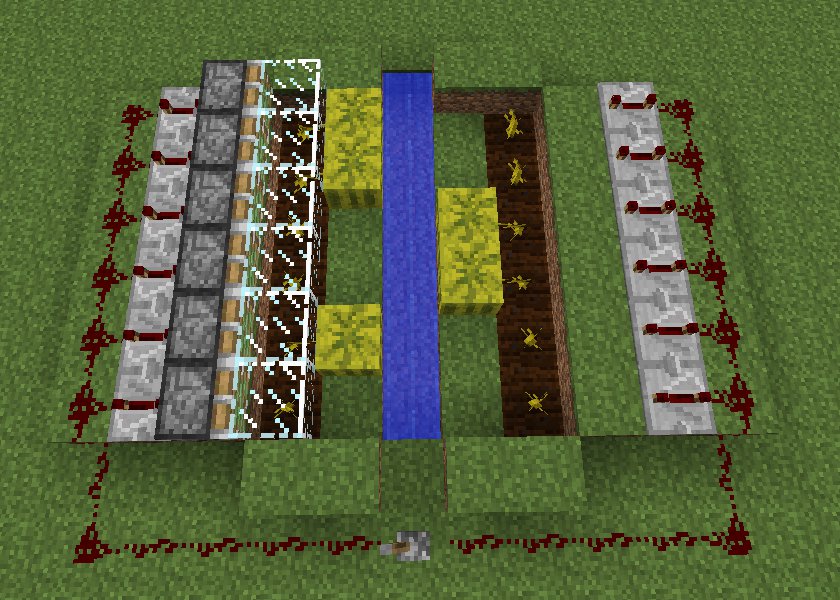
This (semi-)automatic farm works like that: whenever you activate the lever at the front, some underground sticky pistons (two blocks below the melons) push all melons up, before they are crushed by the glass blocks at the top. The glass blocks also push the spawned items into the water stream in the center.
We can easily improve the efficiency of this farm by placing more farmland blocks around the stems. Also, the glass blocks used to crush the melons can be replaced with glowstone, which will provide sufficient lighting at all times and prevent hostile mobs from spawning:
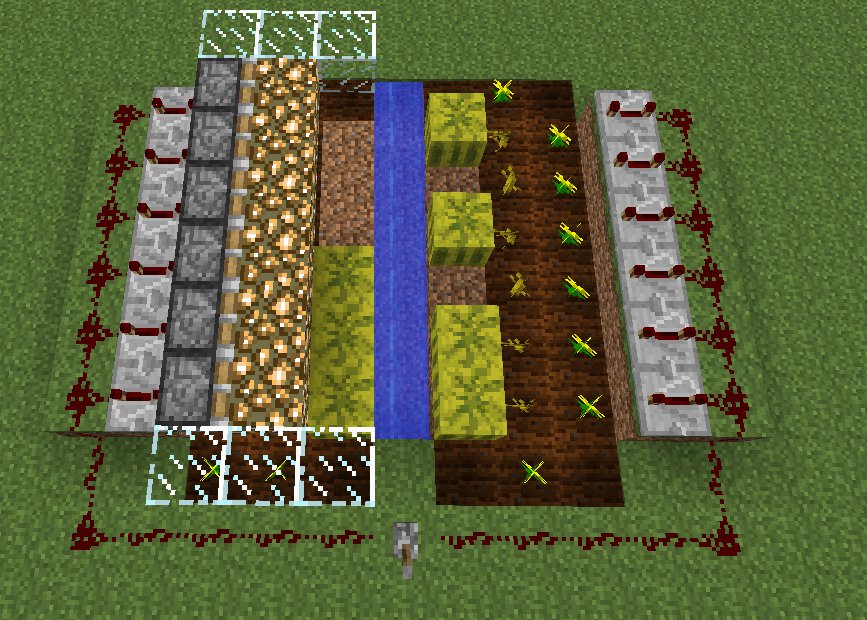
As you can see, all melon stems are now surrounded by farmland. Only the rows where the melons are supposed to spawn are left out. Flowers are used to prevent melons from spawning. So instead of having 2 adjacent farmland blocks, every stem now has 5 such neighbors (6 RT vs 4 RT). The first and last stem of each row even went from 1 adjacent farmland block to 6 (6 RT vs 3 RT).
What’s the best (non-automatic) farm?
First of all, the perfect layout depends on whether you want the fruits to spawn as fast as possible (requires frequent harvests) or if you just want the farm to spawn as much fruit as possible over a long period of time (infrequent harvests). Moreover, it’s very hard to predict how efficient a specific layout turns out.
Anyway, to not leave you hanging, I made a simulation testing several flat layouts. There are some restrictions though: first, I used a fixed size of 21x21 blocks. Second, I didn’t include water blocks which are needed to hydrate the farmland. And third, the simulation assumes that all ground blocks are farmland, i.e., you’d have to retill everything after each harvest.
Here’s how they perform over time:
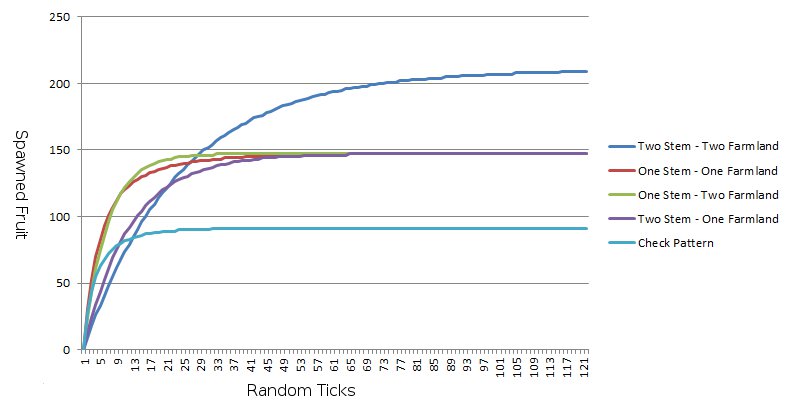
Click here to see a sketch of the layouts used. The y-axis represents the amount of spawned fruit (median, 1000 runs), and the x-axis represents the time passed in random ticks (1RT = 68s on average).
Apparently, the 2 stem, 2 farmland layout (blue line) has the highest capacity as it allows fruit to grow on every second block (a bit less once you add water for hydration) and is best used for infrequent harvests. It’s rather slow, however, because all the stems are penalized for having diagonal neighbors. The check pattern (cyan line) starts relatively fast, but has a very low capacity, since one fruit spawn blocks up to 4 stems. Interestingly, the remaining layouts have about the same capacity. The 1 stem, 1 farmland layout (red line) is the winner until about 10 RT, when the 1 stem, 2 farmland layout (green line) catches up. The 2 stem, 1 farmland layout (purple line) is inferior at all times until it’s reached its capacity.
So according to the results of this simulation, you should use either the 1 stem, 1 farmland or the 1 stem, 2 farmland layout for frequent harvests, and the 2 stem, 2 farmland layout for infrequent harvests. Avoid the check pattern and the 2 stem, 1 farmland layout.
What’s the best automatic farm?
Again, it depends on your needs. Do you want your farm to be fully automatic (i.e. no button or pressure plate to harvest), or do you want to decide yourself when to collect the fruits? Often, you can also have both (with a lever to toggle modes) at the cost of more redstone.
To my knowledge, there are two types of automatic fruit farms, each relying on pistons to crush the fruit blocks:
- Shared Signal: These farms use a redstone signal coming from a button or pressure plate to activate all crushing pistons at once. The farm shown in section “Improving Existing Farms” falls under that category. They can be very compact, since all you need is 1 or 2 pistons per growing spot plus the wiring. You can also make them fully automatic by adding a redstone clock.
- Individual Signal: One redstone device is used for every single piston. The devices are able to detect a spawned fruit block to activate the piston at the right moment. There are both big and complex designs, like a block update detector (BUD), as well as simple and small ones (e.g. a redstone signal that travels through the fruit block once it has spawned). BUDs may make it possible to preserve the farmland at all times. Before 1.1, this was the only way to make these farms fully automatic. You can also add a mechanism to make them preserve the fruit blocks until you push a button. However, this makes them even more space-consuming. In my opinion, this type of farm is outdated, since farms with a shared signal can be much more compact. However, when running fully automated, there might be the advantage of them being less CPU-intensive, as they don’t need a constantly running redstone clock and the melons get crushed at different times, while with the other farm type, they’re all crushed at the same time, which may cause some lag, epending on your PC/server and the size of your farm.